If your printer is not scanning properly or if it is not working at all, then try the different fixes elucidated in this article to get rid of this issue within minutes.
Printer won’t scan is a very common issue faced by people, especially on Windows devices. If you are going through the same problem, then don’t worry we got you. There can be various reasons why you are facing this issue. But we have already shortlisted some of the most common reasons and their solutions for you.
In this write-up, we have shared three best tried and tested solutions that will help you make your printer scan again. These solutions include using the Windows troubleshooter, checking for the connections, and updating your driver using free driver updaters and Device Manager. So, now let’s jump right into it!
Fix1: Check All The Wires Are Connected Properly
If you are using an external device and it is not working properly. Then, the first thing you should do is to check that all the connections are properly connected. Replug the wires, check the wire is not damaged or the socket in which the printer is connected is working properly.
If you are using a wireless printer, then reconnect the printer. Connect your printer with a different device to check whether the problem is with the printer or in your computer. These were some basic things that you should check before doing anything else. So, now let’s move on to some technical stuff.
Fix2: Run The Troubleshooter
Try using the Windows built-in troubleshooter for the printer to resolve the issue. This tool will help you find the issue and fix the issue automatically. To use this integrated utility follow the steps given below:
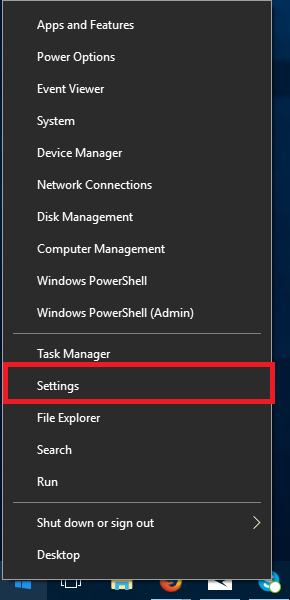
Step1: Right-click on the Start button and select Settings from the options list
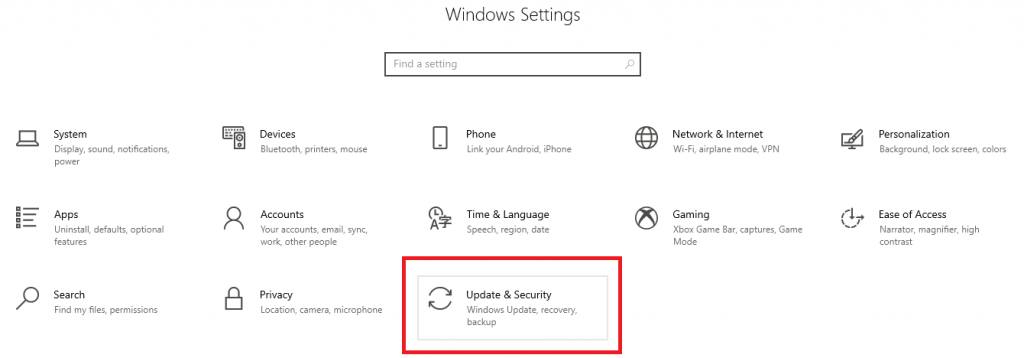
Step2: Choose Update & Security on the Settings window
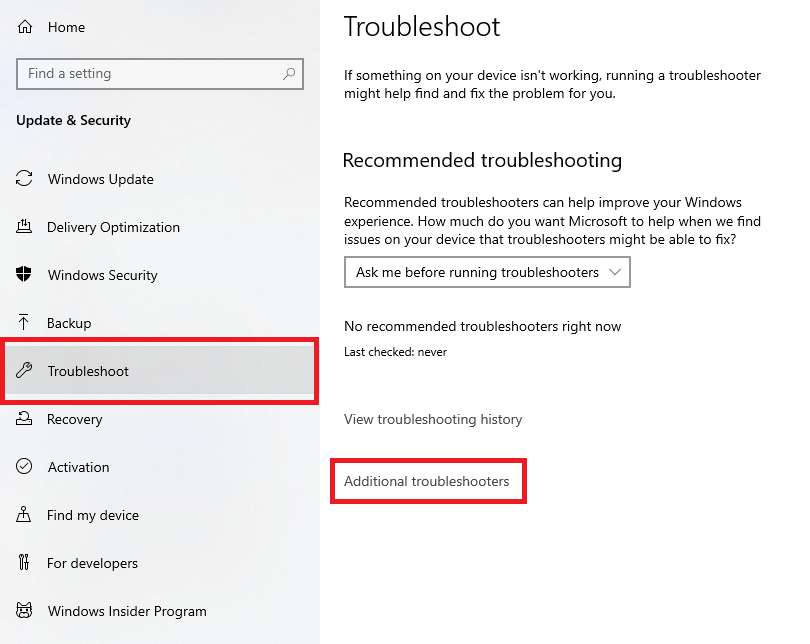
Step3: Click on the Troubleshoot option on the left-hand panel to open a new window
Step4: Under “Recommended Troubleshooting”, click on the Additional troubleshooters button
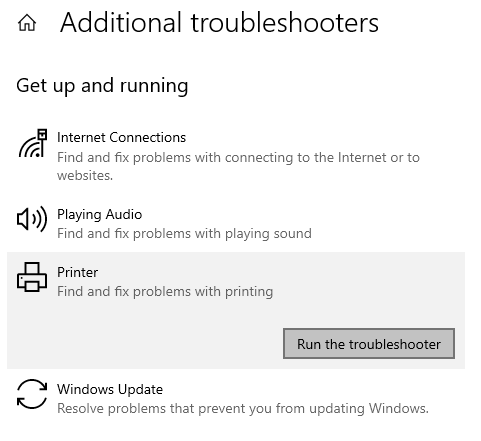
Step5: Now, select the Printer option from the list and then click on the Run the troubleshooter button. Your computer will automatically find and fix the corrupted files.
When the process is finished, Restart your computer and check whether the issue is resolved or not. If not, then jump on to the next method.
Fix3: Update Or Reinstall Printer Drivers
If the troubleshooting doesn’t work, you should consider updating or reinstalling your Windows printer drivers. Usually, when you update your Windows the drivers will also get updated automatically. This happens when the download process has stopped in the middle or if the driver got corrupted.
In these cases, you need to update them manually or by using an application. Don’t worry, below we have shown some steps, which will help you update printer drivers using Windows inbuilt tool Device Manager.
How to update printer drivers using Device Manager:
Step1: Right-click on the Start button and select Device Manager from the options menu
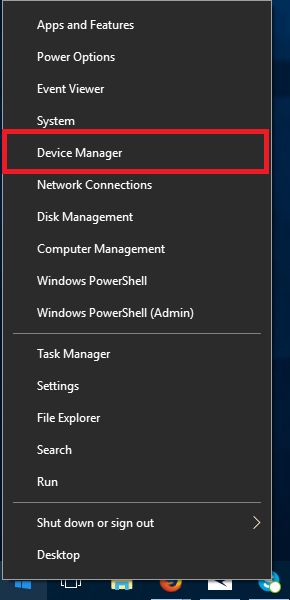
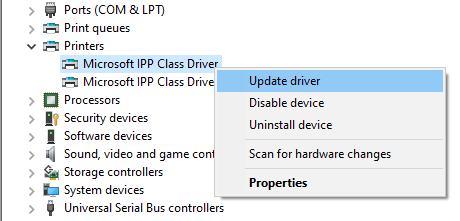
Step2: Click on the arrow next to the Printers
Step3: Now, right-click on the printer driver that you are using and then select Update driver from the list
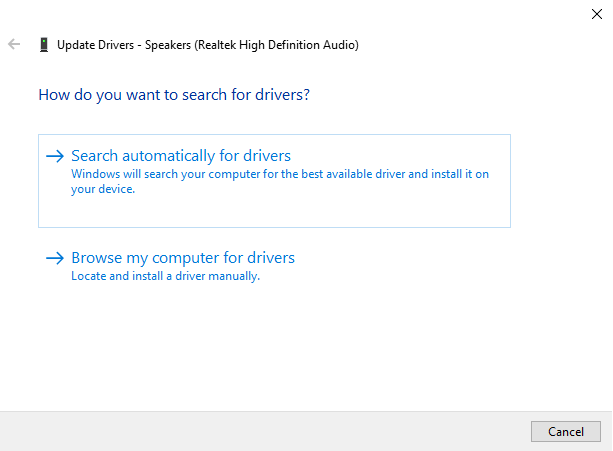
Step4: Select the “Search automatically for drivers” option in the new pop-up window
Step5: Let your computer search for some new updated drivers and then follow the on-screen instructions to install the new drivers
When the process is completed, Restart your computer and check if your printer is working or not.
You can also update your printer drivers using third-party driver updater software. These programs will not only keep your drivers up-to-date, but they will also enhance your computer’s overall performance. Some of these applications also keep a backup of the old drivers, so that you can reinstall them if needed.
Here are the best 5 driver updater programs in the market:
If your printer is still not able to print properly, then try reinstalling your Windows printer drivers. Below are some of the steps that will help you do so.
How to reinstall printer drivers using Device Manager:
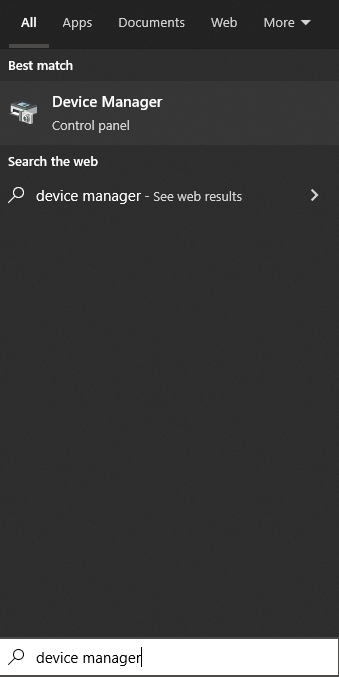
Step1: Search Device Manager in the taskbar and press Enter
Step2: On the Device Manager Window, expand the Printers option
Step3: Now, right-click on the driver that you are using and select Uninstall driver
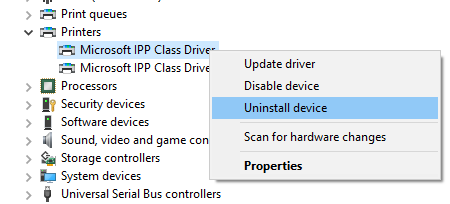
Step4: Click on the Uninstall button to confirm your actions
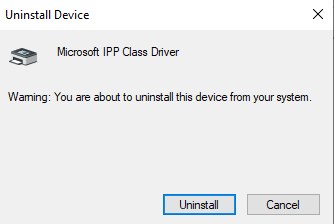
Wait for the process to complete, then Restart your computer and your computer will automatically install a new set of printer drivers for you. Check if the issue is resolved. You can also manually download the driver from Microsoft’s official website.
Printer Won’t Scan Issue Resolved
We hope the fixes discussed in this post have helped you make your printer scan again. All these methods are tried and tested and are the most efficient ways to resolve this issue. We recommend you try these methods in the way they are mentioned. You can also contact Windows Support for some professional opinion
.
If you have any thoughts or suggestions regarding this guide, please write them down in the comments section below.
